How to Repair or Replace Broken Garage Door Springs
Replace Springs and Cables—Safely
When it comes to the smooth operation of your garage door, the condition of the springs and cables is paramount. Over time, these components can wear out or break, leading to issues in properly functioning your garage door. If you find yourself facing a situation where the garage door springs or cables need replacement, it’s crucial to approach the task with safety as the top priority.
Safety First: Key Considerations
- Protective Gear: Before diving into any garage door repair or replacement, ensure you have the necessary protective gear. This includes safety glasses, gloves, and sturdy footwear to shield yourself from potential accidents.
- Release Tension: Before attempting to replace the springs or cables, release the tension in the existing components. Use winding bars to carefully unwind the springs, following proper safety protocols to prevent injuries.
- Sturdy Ladder: A sturdy ladder is an essential tool for safe and efficient spring and cable replacement. Make sure it’s positioned on a level surface and supports your weight and the tools you’ll use.
- Locking Pliers: Use locking pliers to secure the door in place. This prevents any unexpected movement while you’re working on the springs and cables, reducing the risk of accidents.
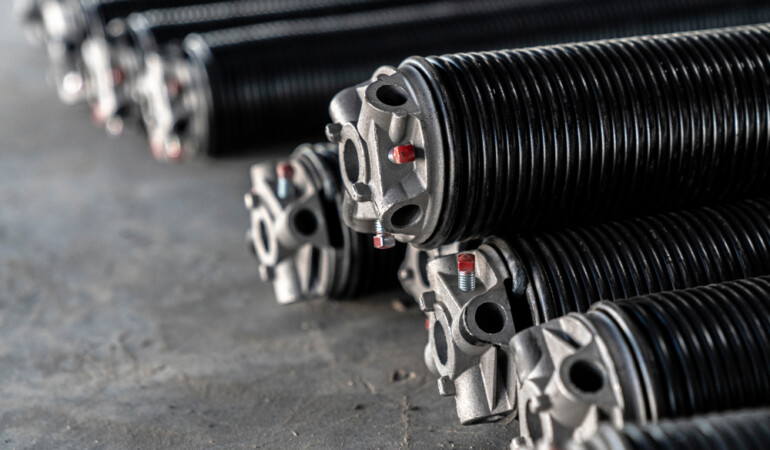
- Understand Garage Door Mechanics: Familiarize yourself with the specific type of springs and cables your garage door uses. Different doors have different systems, and understanding the mechanics will help you approach the replacement process more confidently.
Remember, if you ever feel unsure or uncomfortable during the replacement process, it’s advisable to seek professional assistance.
Symptoms of Garage Door Spring Issues
Identifying potential issues with your garage door springs is crucial for timely repairs. Recognizing the symptoms can save you from more extensive damage and costly repairs down the line.
- Visible Wear and Tear: Inspect the springs for visible signs of wear, such as rust, corrosion, or deformation. Any noticeable damage indicates a need for replacement.
- Uneven Movement: If your garage door exhibits uneven movement or jerks during operation, it could indicate a worn-out or broken spring. An unbalanced door is not only inefficient but also poses a safety risk.
- Loud Noises: Unusual and loud noises, such as creaking or snapping sounds, may indicate issues with the springs. Regular maintenance can help prevent these problems, but it’s time to check the springs if they persist.
- Difficulty Opening or Closing: Springs play a vital role in the smooth operation of the garage door. Difficulty in opening or closing the door could signal a problem with the springs, requiring immediate attention.
- Door Appears Heavy: If your garage door feels unusually heavy when manually operated, it clearly indicates that the springs are not providing adequate support. This can lead to further strain on the opener and other components.
Regularly inspecting your garage door and promptly addressing these symptoms can extend your springs’ lifespan and ensure the door’s overall functionality.
Ensuring Garage Door Safety Post-Repair
After successfully repairing or replacing your garage door springs, ensuring ongoing safety is paramount. Following these post-repair safety measures will help maintain a secure and efficient garage door system.
- Test the Door: Perform a thorough test of the garage door’s functionality. Check both manual and automatic operations to ensure smooth movement without any unusual sounds or hesitations.
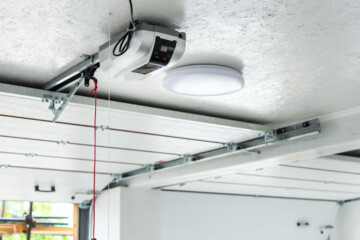
- Inspect Cables: Examine the replaced cables for proper installation and tension. Ensure they are securely fastened to the drum and brackets to prevent any issues during operation.
- Lubricate Moving Parts: Apply a suitable garage door lubricant to all moving parts, including hinges, rollers, and springs. Proper lubrication reduces friction and promotes smooth door movement.
- Check Safety Features: If your garage door is equipped with safety features such as sensors and auto-reverse mechanisms, test them to ensure they are working correctly. These features are essential for preventing accidents and injuries.
- Regular Maintenance: Implement a regular maintenance schedule for your garage door. Periodic inspections, lubrication, and minor adjustments can prevent potential issues and prolong the lifespan of your door system.
Remember, if you encounter any challenges during the repair process or have concerns about the post-repair safety of your garage door, it’s advisable to consult with a professional for assistance. Safety should always be the top priority when dealing with garage door components.
Replace Extension Garage Door Springs by Following These Steps
Disconnect Torsion Springs
When it comes to replacing extension garage door springs, a systematic approach is crucial for a safe and effective outcome. Follow these steps carefully to ensure a successful replacement, starting with disconnecting the torsion springs:
- Identify Torsion Springs: Locate the torsion springs on your garage door system. These are typically mounted horizontally above the door.
- Release Tension: Use winding bars to release the tension in the torsion springs carefully. Follow proper safety protocols to avoid accidents during this step.
- Unwind the Springs: Gradually unwind the torsion springs using the winding bars. Take note of the number of turns required to unwind each spring, as this information will be essential during reinstallation.
Disconnect Safety Cable
Once the torsion springs are safely disconnected, proceed to disconnect the safety cable:
- Locate Safety Cable: Identify the safety cable attached to the garage door. This cable is an additional safety measure designed to prevent the extension springs from causing damage if they break.
- Remove Safety Cable: Carefully remove the safety cable from the brackets and any other securing points. Ensure that there is no tension left in the cable before proceeding.
- Inspect for Damage: Take this opportunity to inspect the safety cable for any signs of wear, fraying, or damage. Replacing the cable with the extension springs is advisable if the cable shows any issues.
Prepare the Garage Door
Before installing the new extension springs, it’s essential to prepare the garage door:
- Secure the Door: Use locking pliers to secure the garage door in place. This prevents any unexpected movement and adds an extra layer of safety during the replacement process.
- Clear the Area: Ensure the area around the garage door is free of any obstacles or items that could interfere with the replacement process.
Attach Safety Cable
As a safety precaution, reattach the safety cable to the garage door:
- Secure Attachment Points: Fasten the safety cable to the brackets and any other designated attachment points. Ensure a secure and tight connection to prevent any slack.
- Proper Alignment: Verify that the safety cable is aligned correctly and runs smoothly through its designated path. Any misalignment could affect its effectiveness in case of a spring failure.
By following these steps diligently, you lay the groundwork for a safe and successful replacement of extension garage door springs. The following steps will guide you through the remaining process, ensuring a comprehensive and effective solution to your garage door issues.
Buy New Springs
Before replacing your extension garage door springs, you must ensure you have the correct replacement parts. Follow these steps when purchasing new springs:
- Identify Spring Specifications: Examine the existing springs to determine their specifications, including size, length, and weight capacity. This information is crucial for purchasing compatible replacement springs.
- Consult Manufacturer Guidelines: Refer to the manufacturer’s guidelines for your garage door system. Manufacturers often provide specific recommendations for compatible springs, ensuring optimal performance.
- Purchase Quality Springs: Invest in high-quality extension springs from reputable suppliers. Quality materials contribute to the longevity and durability of the springs, reducing the likelihood of premature wear.
- Consider Professional Advice: If you’re uncertain about the correct type of springs for your garage door, consider seeking professional advice or consulting with the supplier. Choosing the correct springs is vital for the safety and efficiency of your garage door.
Loosen the Unbroken Spring
Before removing the existing springs, it’s crucial to loosen the unbroken spring to facilitate the replacement process:
- Identify Unbroken Spring: Determine which of the extension springs is still intact. The unbroken spring will need to be loosened to allow for the removal of the damaged one.
- Use Winding Bars: Insert winding bars into the winding cone of the unbroken spring. This will enable you to release tension and unwind the spring safely.
- Turn Winding Bars Gradually: Turn the winding bars gradually, releasing tension in the unbroken spring. Take note of the number of turns required, as you’ll replicate this when installing the new springs.
Lubricate and Test Springs
Once the old springs are removed, and the unbroken spring is loosened, it’s time to prepare the new springs for installation:
- Apply Lubricant: Before installing the new extension springs, apply a suitable garage door lubricant to ensure smooth operation. Lubricate the coils and pivot points to reduce friction.
- Test New Springs: Before fully installing the new springs, perform a preliminary test to check their functionality. Ensure there are no unusual sounds and the springs respond smoothly to the tension adjustments.
Use Two Winding Bars
When winding the new garage door tension springs, using two winding bars is a safety measure that helps distribute the load evenly:
- Insert Winding Bars: Insert two winding bars into the winding cones of the new extension springs. This provides better control and stability during the winding process.
- Maintain Balance: Using two winding bars helps maintain balance and reduces the risk of the bars slipping or losing control. It’s a safety precaution that ensures a more controlled installation.
Wind the Garage Door Tension Springs
With the preparation complete, it’s time to install the new extension springs:
- Attach Springs to Door: Securely attach the new extension springs to the designated brackets on the garage door. Ensure they are correctly aligned and positioned.
- Use Winding Bars to Wind Springs: Insert the winding bars into the winding cones of the new springs. Gradually wind the springs in the same number of turns as noted during the loosening of the unbroken spring.
- Adjust Tension: Adjust the tension of the new springs according to the weight and specifications of your garage door. Achieve a balanced tension to ensure smooth and efficient door operation.
Secure the Torsion Tube
After winding the garage door tension springs, securing the torsion tube is a crucial step to ensure stability and proper functioning:
Position Torsion Tube: Ensure the torsion tube is aligned with the garage door. It should be securely in place to prevent any misalignment during operation.
Use Set Screws: Secure the torsion tube using set screws. Tighten them adequately to prevent any movement or slippage. A securely fastened torsion tube is essential for the overall stability of the garage door system.
Anchor the Cable in the Slot
Proper cable anchoring is essential for maintaining tension and preventing any mishaps during garage door operation:
Locate Cable Slot: Identify the designated slot for anchoring the lift cable. This is usually located on the drum or cable drum.
Thread the Cable: Thread the lift cable through the designated slot, ensuring it is properly aligned and securely anchored. A well-anchored cable prevents slack and contributes to the overall safety of the garage door.
Stretch the Springs
To optimize the tension in the garage door springs, stretching is a critical step:
- Gradual Stretching: With the garage door in the closed position, gradually open it to stretch the springs. This process helps distribute tension evenly across the springs and ensures proper balance.
- Monitor Movement: While stretching the springs, closely monitor the movement of the garage door. Ensure that it moves smoothly and without any jerking or imbalance. Adjustments may be necessary if any issues are detected.
Measure the Inner Diameter and Length
Accurate measurements of the inner diameter and length of the springs are crucial for achieving the correct tension:
- Use Measuring Tools: Utilize appropriate measuring tools to determine the inner diameter of the springs. This measurement is essential for proper calibration.
- Measure Length: Measure the length of the springs. This measurement, combined with the inner diameter, helps ensure the correct amount of tension is applied to the specific garage door system.
Disconnect Lift Cables
Before completing the installation, disconnecting the lift cables is the next step:
Release Tension: Use the winding bars to release tension from the lift cables. This step is important before connecting the stationary cones to the bracket.
Detach Cables: Carefully detach the lift cables from the garage door once tension is released. Ensure that they are free from any entanglements or snags.
Connect Stationary Cones to the Bracket
Connecting the stationary cones to the bracket is a crucial element in securing the garage door system:
Align Stationary Cones: Align the stationary cones with the brackets on either side of the garage door. Ensure proper positioning for secure attachment.
Secure with Set Screws: Once aligned, use set screws to secure the stationary cones to the brackets. Tighten the screws adequately to prevent any movement.
Finish With a Test of the Garage Door Tension Spring
The final step involves testing the garage door tension spring to ensure optimal functionality:
- Operate the Door: Test the garage door by operating it manually or using the automatic opener. Observe the smoothness of movement and listen for any unusual sounds.
- Check Balance: Confirm that the door is well-balanced and remains in position when partially opened. A balanced garage door is essential for preventing unnecessary strain on the opener and other components.
- Perform Safety Checks: Ensure that all safety features, such as sensors and auto-reverse mechanisms, function correctly. Perform any additional safety checks recommended by the manufacturer.
Let FIX Garage Doors CA Help If the Torsion Spring is Broken
While many of the problems we have listed have pretty simple solutions, you may find that they are beyond what you can handle regarding ability, knowledge or time. So, if a garage door is not lifted by a torsion spring broken, it might be easier to turn to the professionals.
That is why it is so easy to let the experts at FIX Garage Doors CA help. With our years of experience in this industry, we have a knowledgeable staff and a large inventory of parts to solve these problems quickly.
Check out our torsion spring repair page to learn about our services and parts. Please call us now at toll-free (905) 247-6699 to get your garage door mechanism in perfect working condition on same-day service in Toronto and the GTA surrounding areas.
Date of page creation: November 13, 2023
Page update date: November 21, 2023